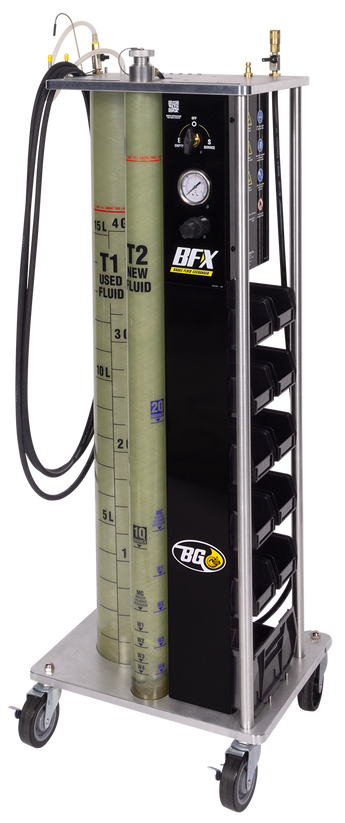
PN E101-3493
INSTRUCTIONS
Caution! Carefully read the BG BFX instructions before beginning vehicle service.
Caution! Read the Safety Data Sheet before handling any BG product.
Caution! Make absolutely certain to use the correct brake fluid for the vehicle being serviced.
Caution! Do not attempt to service a vehicle equipped with DOT 5 silicone fluid with this equipment. DOT 5 brake fluid is not compatible with any other brake fluid or the components of the BG BFX.
Caution! Perform services only in well-ventilated areas.
Caution! Brake system may be under pressure.
Caution! Keep all hoses and tools away from moving engine parts.
Notice: Brake fluids WILL strip paint and dissolve certain rubber and plastic components.
Notice: Check all brake lines and hoses for cracks and sharp creases that could impede flow.
Notice: Store and dispose of used brake fluid in accordance with local, state, and federal regulations.
Notice: Always follow vehicle manufacturer’s recommended brake flushing and brake bleeding procedures!
Contents:
- (1) BG BFX Brake Fluid Exchanger
- (1) Adaptor Set (E100-2476)
- (1) Completer Set (E100-2475)
- Bleeder adaptors
- DA49 Mini Suction Wand
- DA50 Dispensing Wand
- (10) Bin, 7 1/2 X 4 X 3 (E101-4062)
- (1) Bin, 9 1/2 X 6 X 5 (E101-4063)
Initial Inspection and Setup
- Remove packing material from the BG BFX and inspect for damage and missing components.
- Install bins as shown in photo.
- Unpack brake cap adaptors and place into the bins.
- Place the bleeder adaptors onto the magnetic holder on top of the machine.
- Place rubber suction elbows on storage pegs on top of machine.
- Insert the DA49 Mini Suction Wand and DA50 Dispensing Wand into the corresponding marked holes on top of the machine.
Preparing for Service
- Verify the Service Selector (V) is in the “Off” (O) position and the Pressure Regulator (R) is turned all the way down (counter-clockwise).
- Close ball valves on both the New and Used Fluid Hoses.
- Remove fill cap on top of New Fluid Tank (T2) and add BG brake fluid.
Caution! Do not attempt to service a vehicle equipped with DOT 5 silicone fluid with this equipment. DOT 5 brake fluid is not compatible with any other brake fluid or the components of the BG BFX. - When the New Fluid Tank (T2) is filled with the desired amount of fluid, replace fill cap on New Fluid Tank (T2) securely.
- Attach air source to air inlet on the back of the BG BFX.
- Place vehicle on a lift to gain access to brake bleeder valve(s) at each wheel. Break each bleeder valve loose and then close to make sure all are functioning properly.
Notice: DO NOT use the bleeder adaptors to break loose stuck valves. - Replace any stuck or malfunctioning bleeder valves before performing the service.
- Lower the vehicle to ground level and remove the cap from the vehicle brake master cylinder reservoir.
BG Brake Service
- Turn Service Selector valve (V) to “Service” (S). Insert suction wand into vehicle brake master cylinder reservoir, open the ball valve, and remove all of the old brake fluid. For compartmental reservoirs, use the mini suction wand to get out as much old fluid as possible.
- Close the used fluid hose (–) ball valve and turn the Service Selector (V) to “Off” (O).
- If filling the master cylinder is required before connecting the adaptor:
- Attach the DA50 Dispensing Wand to New Fluid Hose (+).
- Turn Service Selector (V) to “Service” (S).
- Adjust Pressure Regulator (R) to approximately 5 PSI.
- Place the DA50 Dispensing Wand into the master cylinder.
- Slowly open the valve on the New Fluid Hose (+) to fill the reservoir.
- Fill to reservoir’s full level indicator.
- Close the valve on the New Fluid Hose and remove DA50 Dispensing Wand.
- Attach appropriate master cylinder reservoir adaptor to the vehicle master cylinder. Make sure the adaptor is attached securely because this connection will be pressurized!
- Connect New Fluid Hose (+) to master cylinder reservoir adaptor. Turn the Pressure Regulator (R) clockwise to achieve desired pressure on the New Fluid Tank (T2). Use vehicle OEM recommended brake system flushing pressure, if available. If not, set the regulator at approximately 12 PSI.
- Open the valve on the New Fluid Hose to fill the vehicle brake master cylinder reservoir. This process will compress the air in the reservoir leaving a little space between the adaptor and the fluid level in the reservoir. This will allow the adaptor to be removed at the end of the service without spilling fluid. Check closely for leaks around the adaptor seal.
- Raise the vehicle.
- If OEM does not specify brake fluid exchange procedure, start with the wheel farthest from the master cylinder, usually the passenger-side rear.
- Select appropriate size bleeder adaptor and place on the brake bleeder. Turn Service Selector (V) to “Service” (S). Open the ball valve on the Used Fluid Hose (–). Insert the end of the suction wand into the bleeder adaptor and slowly open the bleeder.
- Watch the New Fluid Tank (T2) on the BG BFX. When the fluid level hits the bottom marker for the wheel being serviced, close the bleeder and move to the next farthest wheel from the master cylinder and repeat the procedure.
- When all wheels have been serviced, turn the Service Selector (V) to “Off”, close the ball valve on the Used Fluid Hose (–) and wait until the gauge reads 0 PSI.
Caution! Failure to release pressure from the master cylinder will result in fluid being sprayed when New Fluid Hose is disconnected from master cylinder reservoir adaptor. - Turn the Pressure Regulator (R) counter-clockwise until it stops.
- Lower the vehicle to the ground.
- Close the ball valve on the New Fluid Hose (+) and disconnect New Fluid Hose (+) from adaptor.
- Remove master cylinder reservoir adaptor and adjust fluid level as necessary.
- Clean and reinstall vehicle brake master cylinder cap securely.
WARNING! Always test brakes before moving the vehicle!
Emptying BG BFX Used Fluid Tank (T1)
- Verify the used fluid ball valve is closed.
- Place the used fluid suction wand into a suitable waste container and secure it.
- Connect shop air to the BG BFX machine.
- Turn the Service Selector (V) to “EMPTY” (E).
- Open the ball valve on the Used Fluid Hose (–) to start draining the Used Fluid Tank (T1).
- When the Used Fluid Tank (T1) is empty, turn the Service Selector (V) to “Off” (O).
- Close the ball valve on the Used Fluid Hose (–).
Specifications
Height:
55 in/140 cm
Width:
20.5 in/52 cm
Depth:
16 in/41 cm
Weight:
93 lbs/42 kg
Fluid capacity:
5 gallons/19 Liters Used – 1 gallon/3.8 Liters New
Maximum rated pressure:
145 psi/10 bar
Construction:
Aluminum frame, fiberglass tank, steel housings
MADE IN U.S.A.
R01
©copyright 2023 BG Products, Inc. • Wichita, Kansas 67213


